Welcome!

Welcome to my blog! Add me as a friend on Facebook! You can also folow me on Twitter. If you have any questions on quilting, I can try to answer them for you, or you can check out my FAQ, or email me at skippitydodahquilts@yahoo.com

Happy Quilting!

About Me

My photo
I'm just a new wife who has an obsession with my sewing machine! In Oct. 2010, my mother and I created my first sewing project - Euro pillow shams. I was hooked! I read everything I could get my hands on that had to do with sewing! Books, magazines, online tutorials. I experimented and found that I get so much enjoyment from making quilts, and that it's where I found my niche. I'm still a beginner, but I've learned so much in just 5 short months, that I want to share it with someone!

Thursday, April 28, 2011

WIP's

First, I see I have a couple new followers! Thanks so much for reading, I truly value your thoughts and words, so please don't hesitate to comment with words of advice! You all inspire me to live up to the best version of myself :). Oh, and I'm up to double digits in followers! It may seem insignificant to some of you, but it's a huge milestone for me :).

Okay, enough sappy, on to serious business :o).

WIP's

Oh man, have I got WIP's. 

In addition to the WIP's I'll be showing you, I'll also be quilting the quilt for my aunt, starting on my first show quilt, starting on the disappearing 9-patch I talked about several weeks ago, and two rag quilts for my Etsy store. 

Fun, huh? :). I like it! 

So, firstly, I'd like to introduce you to the Schnibbles 'Bennington' wall-hanging that will go in my sewing room. 


In true Emily fashion, I couldn't let this lovely pattern be swallowed up by serious fabric! So, the decision has beem made to make this wall-hanging into a COLOR WHEEL!!!!!

The fabrics I chose are all Moda Marble Solids, except the red

The light colored snowballs are going to be light grays. I love the music notes!
The inner border and backing is going to be the multi-color words from Make Life by Sweetwater for Moda. 

How fun!!! I'm so excited for this quilt!

My next WIP is also just as colorful!

In Baker's Dozen, there is a quilt called Slushie. Who could resist making this quilt with a name like Slushie?!


I love the colors in this quilt, and I stuck pretty closely to what they suggested. The fabric I chose for this quilt is Botany by Lauren and Jessi Jung for Moda.


The solid colors I chose are all Moda Marble Solids, and they stick pretty close to what the pattern calls for. But I did choose a yellow outer border, also, from Botany. The pattern calls for a pink outer border, but I felt that it would compete with the pink I had already chosen. 


My third WIP is from a book called 5-10-15+ Fat Quarters. The pattern is called Snowballs in Plaids. 


I had to change it up! I'm using a Punctuation by Sandy Klop of American Jane for Moda in place of the plaid. How fun! 


I felt that this pattern was perfect for this fabric, because of the time period both of these have. I wanted to keep with the 30's theme of the fabric, and not pair it with a modern pattern. In the time period that these fabrics were the inspiration for, quilts were made for a functional purpose, and that's what I love about this pattern. It looks the part.

Something to be aware of - This block is a little time consuming because of its size and the small squares involved, so you will want to be aware of that if you plan on doing this block.

So, what are your WIP's this week? Anything colorful?

Happy Quilting!

Wednesday, April 27, 2011

Bella Vita

When I was a little girl, my parents and I lived in a very old farm house in the country. I remember one day, running through the yard with one of those plastic pinwheels that you get at the dollar store. It sticks so firmly in my mind because of the bright colors and the sun reflecting off of the blades as it spun wildly in the breeze.


That is one of my favorite memories. Such a simple, beautiful time. 

That's what this quilt reminds me of  - summers in the Midwest, drinking slushies in the car with the windows down, my ice cream cone melting in my hand. 

"Bella Vita"


The literal translation is 'Beautiful Life'. I feel it's very fitting. 

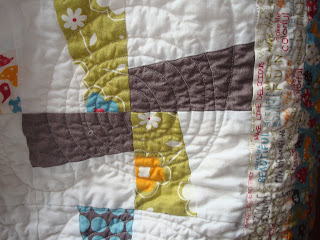
The blades of the pinwheels, borders, binding and backing are all from Make Life by Sweetwater for Moda. The white is Bella Solid. 

I used four charm squares for each block - two white and two printed. 


The original pattern called for the blades to be the same color, but I feel that some rules are just meant to be broken :). This is one of those times. 

I ventured into unknown territory with the quilting of this quilt. For the outer border, I did large loops and swirls. The inner border was small loops and swirls.

And the blocks are quilted in almost a swirly pattern. I was inspired, again, with the idea of the pinwheels spinning, and that's the most literal translation I could do :). I feel as though it turned out nicely.


The backing is so cute :). It's the white with the blue words.


As I finished the quilting, I wanted to keep this one more and more. So here it sits, on my quilt rack. I'm so glad I'm keeping it!


This quilt was very easy to put together and the blocks were put together surprisingly quickly! 


We're having really awful weather here in NW Ohio, so that's the reason for the really...really ugly pictures :). I promise I'll take much prettier pictures once the weather turns around!

Happy Quilting!

Tuesday, April 26, 2011

Sharing the love

You all know my love for Whimsy by Fig Tree Quilts :). 


I've been debating weather or not to let go of the scraps I've been hoarding of this stuff. 

I feel that with the quilt I'm working on now with the Whimsy, the scraps just don't have a place in my life anymore :(. 

BUT! I do want someone else to love them and take care of them :).

So, they're listed in my Etsy store. 


I reeally hope they go to a good home! I am enjoying making the current Whimsy quilt so much and I want someone else to enjoy Whimsy just as much as I do :). 

You can find the listing here. Enjoy!

Happy Quilting!

I caved

And got a roll of batting...!!! Warm And Natural, to be exact!

It's kind-of a funny story really. I need batting for 4 quilts that are almost done. So, to Jo-Ann fabric website, I go. And, lo and behold, batting is 40% off! Yipee! Oh, and I had a 10% coupon :). So, I convinced myself that this was the most economical decision, and I would thank myself in the long run.

My hubby, however, was not so pleased...heehee.
This is how the conversation went, over dinner.

Me: So, I got the batting for my Aunt's quilt, our quilt, and a couple other things.

Hubby: Oh? What was the damage? (As he has a mouthful of food)

Me: Well, I got a lot of it.

Hubby: Yeah, You always get a lot of everything. You're just like your mother. (I'm not sure if that's a compliment or a weak attempt at an insult)

Me: Yeah, but...I really got a lot.

Hubby: Well how much is a lot?

Me: 40 yards?

Hubby then proceedes to choke on his food.

Hubby: Oh my God! Where are we going to put this big momma?! In the living room next to the sofa?!

Me: Well, it can always sleep in bed with me if you keep up the 'tude :) :).

It was quite humerous. We banter back and forth like that daily. We're a very sarcastic couple.

The batting arrived on my doorstep a few days ago, and my hubby walked in the door and saw it and just laughed. Good to know it's not the end of the world! Now, it's nestled in the closet in my sewing room. Out of sight, out of mind, right?! LOL!

Happy Quilting

Saturday, April 23, 2011

Happy Easter!

Happy Easter, everyone! 

I'm so thankful to all my family, friends, readers, and followers who have supported me, laughed with me, cried with me, and shared in my joy with my sewing and quilting journey!

I wouldn't have come this far without everyone, including myself, pushing me to do my absolute best, and to go outside my comfort zone and to try new things!

When I made my first quilt, I thought 'Oh my goodness what have I done?!' (As in, this project was a huge mistake!)

I've learned so much since then, from fellow bloggers, quilt shop owners, and my own family, that it takes A LOT of bad quilting to be a decent quilter! 

I truly could not have come this far without my family, friends, readers, and followers. You all keep me on my toes, and make me want to keep writing, even if I'm a little off my rocker! :o)

Happy Easter to all, and have a safe and joyous weekend!
Oh, and as always, Happy Quilting!

Friday, April 22, 2011

A wonky pinwheel tutorial

Do you remember these pinwheels I showed you earlier this week? 

Well, I'd love to show you how to make them! They are quick, easy, and so addicting, you'll want to crank out dozens of these!

For the quilt top for these pinwheels, I'm using four charm packs - two white, and two of Make Life by Sweetwater for Moda. You can use any combination you want, but I would suggest using a solid and a print. 

*If you don't feel comfortable possibly cutting your squares wrong, then practice on some scraps of 5 inch squares! There is absolutely no harm in practice, I highly encourage it! It took me a few trial and errors for me to get the hang of it :)

Materials Needed

Four Charm Squares - Two charm squares in a solid, and two in a print (matching of the print is not required). 

Sewing machine

Iron

1/4 inch seam foot

Rotary cutter, mat, and a clear ruler at least 6 inches long


Part one


So, you have your four, 5 inch, charm squares. Lay those charm squares on top of each other, in a stack, right sides facing up. This part is VERY important, as you don't want the blades of the pinwheels to face in the same direction!


Part Two

Now that your charm squares are in a stack, right sides facing up, you're ready to cut!

QUICK TIP - To make sure that you cut in the right place, mark your start and stop point with a couple pieces of tape. I always start on a number with zero, because it's like starting on the actual number zero. So, since I placed my squares at the 10 inch mark, I place one piece of tape above the charm squares at the 12 inch mark with the long side facing left, and another piece of tape on the 13 inch mark, with the long side facing right

Now that you're ready to cut, place your ruler with the edges lining snugly up with each line that you have marked with the tape. 

Hold your ruler down firmly, without letting it slide, and cut through all four charm packs.


Part Three

At this point, you will now have two stacks :).

I don't like to move them all that much from this general area, otherwise I run the risk of getting everything mixed up and sewing the wrong things together! 

Lay the printed ones out like this.

And your white ones out like this. 
Now you're ready to sew!

Part Four 

Lay your pieces together. You should have four pairs of printed and white squares. 

Using your 1/4 inch seam foot, Sew along the side so that your little blocks look like this.

It's okay if you're not perfect when you line up the side, but try to get it lined up as closely as possible

This is why I don't like to move around these little blocks all that much, so that way you know which side to sew.


Press your seams. It doesn't matter which way you press them. You should now have four more little blocks. 

Part Five

Now that you have four 'things', lay them out in the pinwheel shape!


You will notice that the 'things' are different sizes in terms of length. That's okay! We'll be trimming that off :).

Now, take the top left 'thing' and lay it on top of the bottom left 'thing', with the top seam, making sure that the 'fat' end of the top left, printed 'thing' is sticking out. Sew together using a 1/4 inch seam. 

Repeat for the other half of your pinwheel. 

Trim off the excess, using the rotary cutter, mat, and ruler. Make sure the skinny end of printed block is not the end you're cutting off!


Press your seams in opposite directions from each-other. This will make piecing the blocks and making a nice point a lot easier. 

This is what you should have. 


Part Six

Now that your seams are pressed in opposite direction, you're ready to finish the block!

Making that little notch in the middle, with your seams pressed in opposite directions, line up the straight edges of your two half-blocks.


Remember, you want to line up your half-blocks going from the center - outward. When you do this, you will have a longer strip on each side that will be trimmed off.


Sew the seam, with your 1/4 inch foot.
Trim off the excess on each side.


Press your seam to one side - it doesn't matter which side you press.

And you're done! You should feel very proud of yourself :). It looks complicated, but it's easy!

I like easy blocks that look hard. So go make many more and make a pretty quilt top!


Happy Quilting!

Wednesday, April 20, 2011

A Day At The Zoo

This is the first quilt I've made specifically for a boy! 

"A Day At The Zoo"


I used "2-D Zoo" by Alexander Henry and brown and white gingham. 

This quilt went by very fast! From start to finish, about 3 days.

It measures approx. 41"x46". 
The unfinished squares are 7" and finished, they are 6". 

It can be found in my Etsy store here.

Happy Quilting! 


Tuesday, April 19, 2011

Quick Tip - Fabric Storage

I'm one of those ladies that whoever dies with the most fabric wins.

:)
I love fabric. 

But recently, I've had some problems storing it. Until I took a trip to the fabric store. 

I thought to myself, "Self, now how are we going to store this fabric?" And then it dawned on me.

Fabric. Bolts.

So, I then proceeded to ask the lovely ladies at the shop if they would so kindly give me their empty bolts. They practically threw them at me, they wanted to be rid of them so bad. 

I, of course, gladly caught them and headed to my car, bolts in hand.

My awesome, lovely, amazingly helpful hubby cut them in half this weekend, and we went to wrapping fabric. 

Some re-arranging of furniture, a new cutting table, and some storage bins later, and I have a re-vamped sewing room!


It almost looks like I know what I'm doing! 

Almost :). 

There are always improvements to be made, so until next time, this will have to do :). 

Happy Quilting!

Monday, April 18, 2011

Pretty Pinwheels


 I've been working on these pretties lately! They're wonky pinwheels! I saw these on a quilt top and was so intrigued!

The main print is Make Life by Sweetwater for Moda, and the backround is Bella Solids in White. In the shop, the quilt top showed each 'blade' of the pinwheel the same color. But, I don't much like playing by the rules, so I made up my own! :). That's the beauty of quilting, you make your own rules!

The awesome, lovely, most generous shop owner taught me the trick of the 'wonky-ness', and it's easy-peasy!

I will be posting a tutorial for the wonky pinwheel soon, so stay tuned!

Saturday, April 16, 2011

A disappearing 9-patch tutorial

Want to create a block that looks impressive, but is easy-peasy? Then the disappearing 9-patch is for you!


This block is soo-ooo easy, and you come out with a great result and you look like a seasoned quilter in the process!

Materials Needed:

9 Charm Squares (a center, contrasting square is optional, but not required.)
Sewing Machine
1/4" Seam Foot. (If you don't have one, I highly suggest you spend the $10 and buy one. It will save you a lot of trouble!)
Rotary Cutter and Mat
A Clear Ruler, at least 12" long
A Little Bit of Imagination!

Part One: 

First, you are going to lay out your charm squares in 3 rows of 3. Make sure to keep in mind the order in which you lay your squares, keeping it in a coordinating, but separate the colors so you don't have the same color up against another square of the same color.
For my block, I chose to use a contrasting solid in the center block. You will understand why the center, but if you choose to do the contrasting solid, always put it in the center and not on one of the edges.

Part Two

Now we are going to sew our rows together. Sew your first row using a 1/4" seam. Press the seams to one side. Your first row should look like this.

Repeat the same step for the second row. However, when you press the seams, press them in the opposite direction from what you pressed your first row. So, if you pressed your seams to the right for the first row, you will press your seams to the left for this row. 

Repeat the same step for the third row, pressing the seams in the opposite direction from what you pressed in the second row. 

You now should have three rows of three charm squares.


Part Three

Now, we will be sewing the rows together, making a 9-patch block. 

Take your top two rows and lay them on top of each other. Make sure the sides you are lining up are the sides you want sewn together. 

To make sure you get that nice little point on your finished block, and none of your squares are off center, you want to kind-of notch the two seams together. See how the way you pressed your seams creates a little crevice for each one to lay? That's how you want yours to look.
Sew your rows together, using this method, and press your seams to one side. It doesn't matter what way you press your seams in this step.

Your block should look like this.


Part Four

Now, your disappearing 9-patch is going to come alive!

Lay your 9-patch block on your cutting mat. Make sure it's straight with at least the bottom line, and one of the side lines. You don't want your squares coming out wonky!

Find the center of your block, and cut with your rotary cutter.

Do the same in the opposite direction, like a cross.


And you're finished! You've created four disappearing 9-patch blocks! Easy-peasy, right?

See that little square in the corner? That's the center, contrasting solid square that I chose! It puts a nice punch to the block, without overwhelming the colors :).

You can lay them out in any order or style that pleases you, because after all, you make the rules in quilting!


Enjoy and Happy Quilting!

Popular Posts